Microsoft Machine Learning Server 使用调研

Machine Learning Server 主要功能

Micorosft Machine Learning Server 前身就是 Microsoft R Server ,加入了 Python 支持后更名。主要用于数据分析模型的商业化使用,并提供分布式、并行等计算功能。

支持以下平台:

  • Windows
  • Hadoop
  • Linux

Machine Learning Server 主要提供以下功能:

功能RPython
在 Machine Learning Server 中运行 R 代码o
使用 RevoScalePy 创建 Python 代码o
使用 MicrosoftML 进行二分分类o
将模型作为 Web 服务发布oo

Machine Learning Server 的特性:

  • 无论您的数据存在于何处,都可以获得高性能的机器学习
  • 微软和开源的最佳人工智能创新
  • 简单,安全,高规模的操作和管理
  • 深入的生态系统参与,以最佳的总体拥有成本实现客户成功

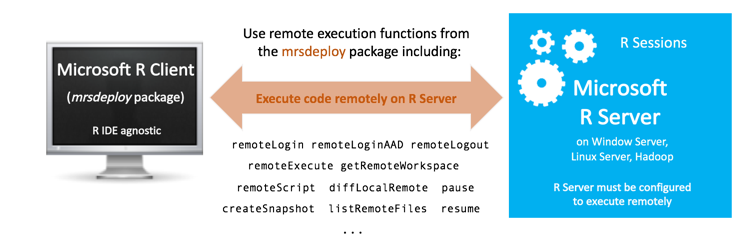
Machine Learning Server 的使用是与 Microsoft R Client 结合进行的。Microsoft R Client 相当于一个 R 的发行版,内置了一些专用的函数,可以进行远程运行代码以及发布 Web 服务。

RevoScaleR 库

提供了一系列 rx 开头的函数,这些函数可以与 Machine Learning Server 结合运行。

数据处理

rxImport 从文本文件、 SAS 、 SPSS 、 SQL Server 、 Teradata 或 ODBC 连接导入数据。原生的数据类型是 XDF 格式。

1
2
3
inDataFile <- file.path(rxGetOption("sampleDataDir"), "mortDefaultSmall2000.csv")
mortOutput <- NULL
mortData <- rxImport(inData = inDataFile, outFile = mortOutput)

关于 Machine Learning Server中的数据存储

在 Machine Learning Server 中,您可以将内存数据用作数据框,或将其作为 XDF 文件保存到磁盘。如上所述, rxImport 可以使用或不使用 .xdf 文件创建数据源对象。如果省略 outFile 参数或将其设置为 NULL,则返回对象是包含数据的数据框。

数据框是 R 中的基本数据结构,在机器学习服务器中完全支持。它是表格,由行和列组成,其中列包含变量,第一行(称为标题)存储列名。后续行为与单个观察相关联的每个变量提供数据值。数据框是在加载某些数据时创建的临时数据结构。它仅在会话期间存在。

.xdf 文件是 Machine Learning Server 本机的二进制文件格式,用于在磁盘上保存数据。 .xdf 文件的组织是基于列的,每个变量一列,这对于统计和预测分析中使用的数据的可变方向是最佳的。使用 .xdf ,您可以加载数据的子集以进行目标分析。此外, .xdf 文件包括可立即使用的预先计算的元数据,无需额外处理。

不需要创建 .xdf ,但是当数据集很大或很复杂时, .xdf 文件可以通过压缩数据和将数据分配到可以独立读取和刷新的块来提供帮助。此外,在像 Hadoop 的 HDFS 这样的分布式文件系统上, XDF 文件可以将数据存储在多个物理文件中以容纳非常大的数据集。

rxGetInfo 一次快速获取有关数据集及其变量的信息,包括有关变量类型和范围的更多信息。

1
2
3
4
5
6
7
8
9
10
11
12
13
14
15
16
17
18
rxGetInfo(mortData, getVarInfo = TRUE, numRows=3)
# 输出
# Data frame: mortData
# Number of observations: 10000
# Number of variables: 6
# Variable information:
# Var 1: creditScore, Type: integer, Low/High: (486, 895)
# Var 2: houseAge, Type: integer, Low/High: (0, 40)
# Var 3: yearsEmploy, Type: integer, Low/High: (0, 14)
# Var 4: ccDebt, Type: integer, Low/High: (0, 12275)
# Var 5: year, Type: integer, Low/High: (2000, 2000)
# Var 6: default, Type: integer, Low/High: (0, 1)
# Data (3 rows starting with row 1):
# creditScore houseAge yearsEmploy ccDebt year default
# 1 691 16 9 6725 2000 0
# 2 691 4 4 5077 2000 0
# 3 743 18 3 3080 2000 0

rxDataStep 为大多数数据操作任务提供了一个框架。 它允许行选择(rowSelection参数),变量选择(varsToKeep或varsToDrop参数),以及从现有变量创建新变量(变换参数)。

1
2
3
4
5
6
7
8
9
10
11
12
13
14
15
outFile2 <- NULL
mortDataNew <- rxDataStep(
# Specify the input data set
inData = mortData,
# Put in a placeholder for an output file
outFile = outFile2,
# Specify any variables to keep or drop
varsToDrop = c("year"),
# Specify rows to select
rowSelection = creditScore < 850,
# Specify a list of new variables to create
transforms = list(
catDebt = cut(ccDebt, breaks = c(0, 6500, 13000),
labels = c("Low Debt", "High Debt")),
lowScore = creditScore < 625))

数据分析

rxSummary 计算变量的表属性统计信息

1
2
3
4
5
6
7
8
9
10
11
12
rxSummary(~ ArrDelay, data = airXdfData)
# 输出
# Call:
# rxSummary(formula = ~ArrDelay, data = airXdfData)
#
# Summary Statistics Results for: ~ArrDelay
# Data: airXdfData (RxXdfData Data Source)
# File name: airExample.xdf
# Number of valid observations: 6e+05
#
# Name Mean StdDev Min Max ValidObs MissingObs
# ArrDelay 11.31794 40.68854 -86 1490 582628 17372
1
2
3
4
5
6
7
8
9
10
11
12
13
14
15
16
17
18
19
20
21
22
23
24
rxSummary(formula = ~ArrDelay + CRSDepTime + DayOfWeek, data = airDS)
# 输出
# Summary Statistics Results for: ~ArrDelay + CRSDepTime + DayOfWeek
# Data: airXdfData (RxXdfData Data Source)
# File name: C:\Users\TEMP\airExample.xdf
# Number of valid observations: 6e+05
#
# Name Mean StdDev Min Max ValidObs MissingObs
# ArrDelay 11.31794 40.688536 -86.000000 1490.00000 582628 17372
# CRSDepTime 13.48227 4.697566 0.016667 23.98333 600000 0
#
# Category Counts for DayOfWeek
# Number of categories: 7
# Number of valid observations: 6e+05
# Number of missing observations: 0
#
# DayOfWeek Counts
# Monday 97975
# Tuesday 77725
# Wednesday 78875
# Thursday 81304
# Friday 82987
# Saturday 86159
# Sunday 94975
1
2
3
4
5
6
7
8
9
10
11
12
13
14
15
16
17
18
19
20
21
rxSummary(~ArrDelay:DayOfWeek, data=airXdfData)
# Call:
# rxSummary(formula = ~ArrDelay:DayOfWeek, data=airXdfData)

# Summary Statistics Results for: ~ArrDelay:DayOfWeek
# File name: C:\Users\TEMP\airExample.xdf
# Number of valid observations: 6e+05

# Name Mean StdDev Min Max ValidObs MissingObs
# ArrDelay:DayOfWeek 11.31794 40.68854 -86 1490 582628 17372

# Statistics by category (7 categories):

# Category DayOfWeek Means StdDev Min Max ValidObs
# ArrDelay for DayOfWeek=Monday Monday 12.025604 40.02463 -76 1017 95298
# ArrDelay for DayOfWeek=Tuesday Tuesday 11.293808 43.66269 -70 1143 74011
# ArrDelay for DayOfWeek=Wednesday Wednesday 10.156539 39.58803 -81 1166 76786
# ArrDelay for DayOfWeek=Thursday Thursday 8.658007 36.74724 -58 1053 79145
# ArrDelay for DayOfWeek=Friday Friday 14.804335 41.79260 -78 1490 80142
# ArrDelay for DayOfWeek=Saturday Saturday 11.875326 45.24540 -73 1370 83851
# ArrDelay for DayOfWeek=Sunday Sunday 10.331806 37.33348 -86 1202 93395

rxLinMod 线性回归

1
2
3
4
5
6
7
8
9
10
11
12
13
14
15
16
17
18
19
20
21
22
23
24
25
26
27
28
29
30
arrDelayLm2 <- rxLinMod(ArrDelay ~ DayOfWeek, data = airXdfData,
cube = TRUE)
summary(arrDelayLm2)
# Call:
# rxLinMod(formula = ArrDelay ~ DayOfWeek, data = airXdfData, cube = TRUE)

# Cube Linear Regression Results for: ArrDelay ~ DayOfWeek
# File name: C:\Users\Temp\airExample.xdf
# Dependent variable(s): ArrDelay
# Total independent variables: 7
# Number of valid observations: 582628
# Number of missing observations: 17372

# Coefficients:
# Estimate Std. Error t value Pr(>|t|) | Counts
# DayOfWeek=Monday 12.0256 0.1317 91.32 2.22e-16 *** | 95298
# DayOfWeek=Tuesday 11.2938 0.1494 75.58 2.22e-16 *** | 74011
# DayOfWeek=Wednesday 10.1565 0.1467 69.23 2.22e-16 *** | 76786
# DayOfWeek=Thursday 8.6580 0.1445 59.92 2.22e-16 *** | 79145
# DayOfWeek=Friday 14.8043 0.1436 103.10 2.22e-16 *** | 80142
# DayOfWeek=Saturday 11.8753 0.1404 84.59 2.22e-16 *** | 83851
# DayOfWeek=Sunday 10.3318 0.1330 77.67 2.22e-16 *** | 93395
# ---
# Signif. codes: 0 '***' 0.001 '**' 0.01 '*' 0.05 '.' 0.1 ' ' 1

# Residual standard error: 40.65 on 582621 degrees of freedom
# Multiple R-squared: 0.001869 (as if intercept included)
# Adjusted R-squared: 0.001858
# F-statistic: 181.8 on 6 and 582621 DF, p-value: < 2.2e-16
# Condition number: 1

rxCrossTabs 数据交叉表

1
2
3
4
5
6
7
8
9
10
11
12
13
14
15
16
17
18
19
20
21
22
myTab <- rxCrossTabs(ArrDelay~DayOfWeek, data = airLateDS)
summary(myTab, output = "means")
# Call:
# rxCrossTabs(formula = ArrDelay ~ DayOfWeek, data = airLateDS)

# Cross Tabulation Results for: ArrDelay ~ DayOfWeek
# File name: C:\YourWorkingDir\ADS1.xdf
# Dependent variable(s): ArrDelay
# Number of valid observations: 148526
# Number of missing observations: 0
# Statistic: means

# ArrDelay (means):
# means means %
# Monday 56.94491 13.96327
# Tuesday 64.28248 15.76249
# Wednesday 60.12724 14.74360
# Thursday 55.07093 13.50376
# Friday 56.11783 13.76047
# Saturday 61.92247 15.18380
# Sunday 53.35339 13.08261
# Col Mean 57.96692

rxLogit Logistic 回归

1
2
3
4
5
6
7
8
9
10
11
12
13
14
15
16
17
18
19
20
21
22
23
logitObj <- rxLogit(Late~DepHour + Night, data = airExtraDS)
summary(logitObj)
# Call:
# rxLogit(formula = Late ~ DepHour + Night, data = airExtraDS)

# Logistic Regression Results for: Late ~ DepHour + Night
# File name: C:\Users\Temp\ADS2.xdf
# Dependent variable(s): Late
# Total independent variables: 3
# Number of valid observations: 582628
# Number of missing observations: 17372
# -2*LogLikelihood: 649607.8613 (Residual deviance on 582625 degrees of freedom)

# Coefficients:
# Estimate Std. Error z value Pr(>|z|)
# (Intercept) -2.0990076 0.0104460 -200.94 2.22e-16 ***
# DepHour 0.0790215 0.0007671 103.01 2.22e-16 ***
# Night -0.3027030 0.0109914 -27.54 2.22e-16 ***
# ---
# Signif. codes: 0 '***' 0.001 '**' 0.01 '*' 0.05 '.' 0.1 ' ' 1

# Condition number of final variance-covariance matrix: 3.0178
# Number of iterations: 4

rxPredict 预测

1
2
3
4
5
6
7
8
9
10
11
12
13
14
15
16
17
18
19
20
21
22
23
24
predictDS <- rxPredict(modelObject = logitObj, data = airExtraDS,
outData = airExtraDS)
rxGetInfo(predictDS, getVarInfo=TRUE, numRows=5)
# File name: C:\Users\Temp\ADS2.xdf
# Number of observations: 6e+05
# Number of variables: 7
# Number of blocks: 2
# Compression type: zlib
# Variable information:
# Var 1: ArrDelay, Type: integer, Low/High: (-86, 1490)
# Var 2: CRSDepTime, Type: numeric, Storage: float32, Low/High: (0.0167, 23.9833)
# Var 3: DayOfWeek
# 7 factor levels: Monday Tuesday Wednesday Thursday Friday Saturday Sunday
# Var 4: Late, Type: logical, Low/High: (0, 1)
# Var 5: DepHour, Type: integer, Low/High: (0, 23)
# Var 6: Night, Type: logical, Low/High: (0, 1)
# Var 7: Late_Pred, Type: numeric, Low/High: (0.0830, 0.3580)
# Data (5 rows starting with row 1):
# ArrDelay CRSDepTime DayOfWeek Late DepHour Night Late_Pred
# 1 6 9.666666 Monday FALSE 9 FALSE 0.1997569
# 2 -8 19.916666 Monday FALSE 19 FALSE 0.3548931
# 3 -2 13.750000 Monday FALSE 13 FALSE 0.2550745
# 4 1 11.750000 Monday FALSE 11 FALSE 0.2262214
# 5 -2 6.416667 Monday FALSE 6 FALSE 0.1645331

数据可视化

R 中常用的可视化函数都有对应的 rx 版本。

rxHistogram 绘制直方图

1
rxHistogram(~ArrDelay|DayOfWeek,  data = airXdfData)

rxLinePlot 绘制折线图

1
2
rxLinePlot(ArrDelay~DayOfWeek, data = countsDF,
main = "Average Arrival Delay by Day of Week")
1
2
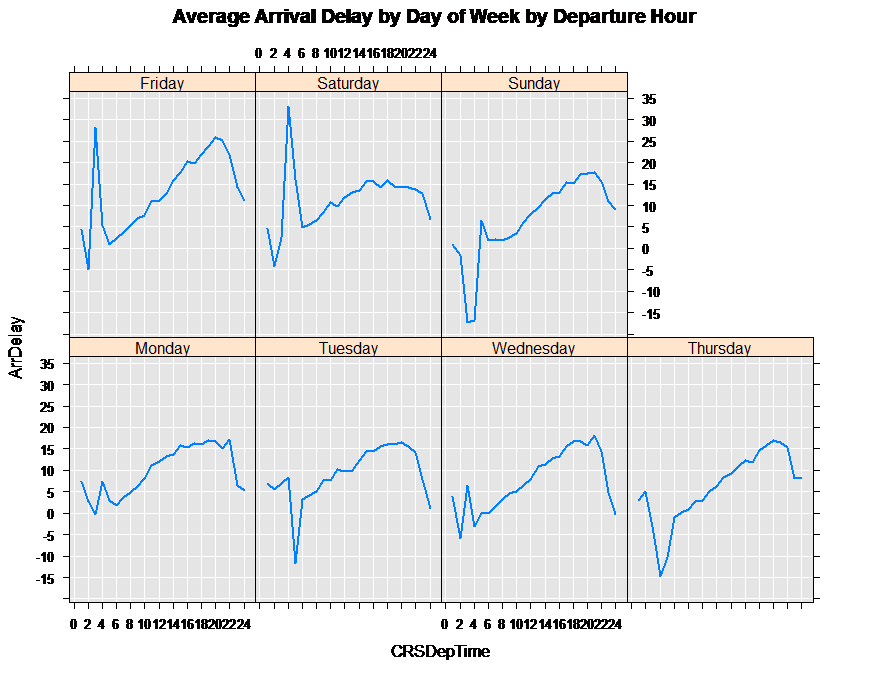
rxLinePlot(ArrDelay~CRSDepTime|DayOfWeek, data = arrDelayDT,
title = "Average Arrival Delay by Day of Week by Departure Hour")

在 Machine Learning Server 中运行 R 代码

计算上下文

在 Machine Learning Server 中,计算上下文是指处理给定工作负载的计算引擎的物理位置。 默认为本地。 但是,如果您有多台计算机,则可以从本地切换到远程,将以数据为中心的RevoScaleR(R),revoscalepy(Python),MicrosoftML(R)和microsoftml(Python)函数的执行推送到另一个系统上的计算引擎。 例如,在R Client中本地运行的脚本可以将执行转移到Spark集群中的远程机器学习服务器以在那里处理数据。

上下文说明
local所有平台上的所有产品(包括R Client)均支持默认值。 脚本使用本地计算机资源在本地解释器上执行。
remote专门针对选定数据平台上的机器学习服务器:Spark over Hadoop分布式文件系统(HDFS)和SQL Server。 客户端或以客户端身份运行的服务器可以启动远程计算上下文,但目标远程计算机本身必须是Machine Learning Server安装。

RevoScaleR 的上下文包括:

上下文别名用法
RxLocalSeqlocal所有服务器和客户端配置都支持本地计算上下文。
RxSparkspark远程计算上下文。 目标是Hadoop上的Spark集群。
RxInSqlServersqlserver远程计算上下文。 目标服务器是单个数据库会话(SQL Server 2016 R服务或SQL Server 2017机器学习服务)。 计算是平行的,但不是分布式的。
RxLocalParallellocalpar计算上下文通常用于依靠您提供的指令而不是Hadoop上的内置调度程序来启用受控的分布式计算。 您可以将计算上下文用于手动分布式计算。
RxForeachDoPardopar用于手动分布式计算。

上下文支持的数据格式

Data SourceRxLocalSeqRxSparkRxInSqlServer
RxTextDataXX
RxXdfDataXX
RxHiveDataXX
RxParquetDataXX
RxOrcDataXX
RxOdbcDataX
RxSqlServerDataXX
RxSasDataX
RxSpssDataX

当数据本身发生变化时,适用于切换上下文。计算应该都是在本地进行的,只是获取数据的上下文发生了改变。

远程执行 R 代码

远程执行是从机器学习服务器(或R服务器)或R客户端向另一个机器学习服务器实例上运行的远程会话发出R命令的能力。 您可以使用远程执行来卸载服务器上的繁重处理并测试您的工作。 在开发和测试分析时,它尤其有用。

远程执行支持以下几种方式:

  • 在控制台应用程序中从命令行执行
  • 在 R 脚本中通过调用 mrsdeply 包的函数执行
  • 通过调用 API 的代码执行

远程执行可以实现的功能:

  • 登陆和登出 Machine Learning Server
  • 生成本地和远程环境的差异报告,并协调任何差异
  • 远程执行 R 脚本或代码
  • 远程使用 R 对象或文件工作
  • 创建和管理远程环境的快照以供重用

远程执行的函数:

  • remoteExecute 用于在远程R会话中执行R代码块或R脚本的基本功能。
  • remoteScript 一个简单的包装函数,用于执行远程R脚本。
  • diffLocalRemote 在本地和远程之间生成“差异”报告。

创建远程会话

使用 mrsdeploy 包的登录函数 remoteLogin()remoteLoginAAD() 在 Machine Learning Server 上进行验证。设置 session = TRUE 创建远程会话,并设置 commandline = TRUE 进入远程控制台。

1
2
3
4
5
6
remoteLogin("http://localhost:12800", 
username = "admin",
password = "{{YOUR_PASSWORD}}",
diff = TRUE,
session = TRUE,
commandline = TRUE)

参数说明:

参数描述
endpointMachine Learning Server HTTP / HTTPS端点,包括端口号。 启动管理实用程序时,可以在第一个屏幕上找到此项。
session如果为 TRUE ,则创建远程会话。 如果省略,则创建远程会话。
diff如果为 TRUE ,则创建一个“差异”报告,显示本地会话和远程会话之间的差异。 参数仅在会话参数为TRUE时有效。
commandline如果为 TRUE ,则在R控制台中创建“REMOTE”命令行。参数仅在会话参数为 TRUE 时有效。如果省略,则与 = TRUE 相同。
prompt用于远程会话的命令提示符。 默认情况下,使用 REMOTE>
username如果为 NULL ,则提示用户输入您的AD或本地计算机学习服务器用户名。
password如果为 NULL ,则提示用户输入密码。

remoteLoginAAD() 函数用于 Azure 云的登录。

在会话间切换或退出

使用三个函数进行远程会话和本地会话切换,以及退出:

  • pause() 从远程会话切换到本地会话
  • resume() 从本地会话切换到远程会话
  • remoteLogout() 登出 Machine Learning Server

使用参数 session = TRUE 登录到远程R服务器后,将创建一个远程 R 会话。 您可以直接从命令行在远程 R 会话和本地 R 会话之间切换。 远程命令行允许您直接与另一台计算机上的 R Server 9.x 实例进行交互。

当R控制台中显示 REMOTE> 命令提示符时,输入的任何R命令都在远程R会话上执行。

使用以下函数在本地命令行和远程命令行之间切换:pause()resume()。 要切换回本地 R 会话,请键入“pause()”。 如果已切换到本地R会话,则可以通过键入“ resume()”返回远程 R 会话。

要终止远程R会话,请在REMOTE>提示符下键入“exit”。 此外,要从本地R会话终止远程会话,请键入“remoteLogout()”。

1
2
3
4
5
6
7
8
9
10
11
#EXAMPLE: SESSION SWITCHING 

#execute some R commands on the remote session
REMOTE>x<-rnorm(1000)
REMOTE>hist(x)

REMOTE>pause() #switches the user to the local R session
>resume()

REMOTE>exit #logout and terminate the remote R session
>

远程执行 R 脚本

如果本地计算机上有R脚本,则可以使用 remoteScript()函数远程执行它们。 此函数采用远程执行R脚本的路径。 您还可以选择保存或显示脚本执行期间可能生成的任何图。 该函数返回一个列表,其中包含执行状态(成功/失败),生成的控制台输出以及创建的文件列表。

如果您的R脚本具有R包依赖项,则必须在 Microsoft R Server 上安装这些包。 您的管理员可以在服务器上全局安装它们,也可以使用 install.packages() 函数在远程会话期间自行安装它们。 将 lib 参数留空。

远程上下文的限制:

  • 某些功能在执行时被屏蔽,例如“help”,“browser”,“q”和“quit”。
  • 在远程上下文中,您无法在命令行提示符下显示晕影或获取帮助。
  • 在大多数情况下,“system”命令有效。 但是,写入stdout/stderr的系统命令可能不会显示其输出,也不会等到整个系统命令完成后才显示输出。 install.packages 是我们在远程上下文中显式处理 stdout 和 stderr 的唯一例外。

要在远程脚本执行期间继续在开发环境中工作,可以异步执行 R 脚本。 当您运行具有较长执行时间的脚本时,异步脚本执行非常有用。要异步执行 R 脚本,请将 remoteScript()async 参数设置为 TRUE 。 执行 remoteScript() 时,脚本将在新的远程 R 控制台窗口中异步运行。 所有 R 控制台输出和来自该执行的任何图都返回到同一窗口。

1
2
3
4
5
6
7
8
9
10
11
12
13
#EXAMPLE: REMOTE SCRIPT EXECUTION 

#install a package for the life of the session
REMOTE>install.packages("bitops")

#switch to the local R session
REMOTE>pause()

#execute an R script remotely
>remoteScript("C:/myScript.R")

#execute that script again in another window asynchronously
>remoteScript("C:/myScript.R", async=TRUE)

远程使用R对象和文件

远程执行R代码后,您可能希望检索某些R对象并将其加载到本地R会话中。 例如,如果您有一个创建线性模型 m <-lm(x~y) 的R脚本,请使用函数 getRemoteObject() 来检索本地R会话中的对象 m

相反,如果您希望远程 R 会话可以使用本地 R 对象,则可以使用函数 putLocalObject() 。 如果要同步本地和远程工作空间,可以使用 putLocalWorkspace()getRemoteWorkspace() 函数。

类似的功能可用于需要在本地和远程 R 会话之间移动的文件。以下函数可用于处理文件: putLocalFile()getRemoteFile()listRemoteFiles()deleteRemoteFile()

1
2
3
4
5
6
7
8
9
10
11
12
13
14
15
16
17
#EXAMPLE: REMOTE R OBJECTS AND FILES 

#execute a script remotely that generated 2 R objects we are interested in retrieving
>remoteExecute("C:/myScript.R")
#retrieve the R objects from the remote R session and load them into our local R session
>getRemoteObject(c("model","out"))

#an R script depends upon an R object named `data` to be available. Move the local
#instance of `data` to the remote R session
>putLocalObject("data")
#execute an R script remotely
>remoteScript("C:/myScript2.R")

#push a data file to the remote R session
>putLocalFile("C:/data/survey.csv")
#execute an R script remotely
>remoteScript("C:/myScript2.R")

绘图的注意事项

远程绘制时,默认绘图大小为400 x 400像素。 如果您需要更高分辨率的输出,则必须告诉远程会话要创建的绘图大小。

在本地会话中,您可以更改宽度和高度,如下所示:

1
2
3
> png(filename="myplot.png", width=1440, height=900)
> ggplot(aes(x=value, group=am, colour=factor(am)), data=mtcarsmelt) + geom_density() + facet_wrap(~variable, scales="free")
> dev.off()

在处理REMOTE命令行时,您需要将这三个语句组合在一起:

1
REMOTE> png(filename="myplot.png", width=1440, height=900);ggplot(aes(x=value, group=am, colour=factor(am)), data=mtcarsmelt) + geom_density() + facet_wrap(~variable, scales="free");dev.off()

作为替代方法,您可以使用 remoteScript() 函数,如下所示:

1
2
3
4
5
6
#Open a new script window in your IDE
#Enter the commands on separate lines

png(filename="myplot.png", width=1440, height=900)
ggplot(aes(x=value, group=am, colour=factor(am)), data=mtcarsmelt) + geom_density() + facet_wrap(~variable, scales="free")
dev.off()

将模型作为 Web 服务发布

mrsdeploy 库提供了一些函数,使 R 模型可以作为 Web 服务发布。

主要流程

  1. 本地编写模型
  2. 将模型作为 Web 服务发布
  3. 在 R 中使用服务进行测试
  4. 获取基于 Swagger 的 JSON 文件
  5. 基于 Swagger 文件与 Web 服务集成

Swagger

大部分 Web 应用程序都支持 RESTful API,但不同于 SOAP API——REST API 依赖于 HTTP 方法,缺少与 Web 服务描述语言(Web Services Description Language,WSDL)类似的语言来定义使用者与提供者之间的请求和响应结构。由于没有充分的合同服务,许多 REST API 提供者使用 Microsoft Word 文档或维基页面来记录 API 用法。这些格式使协作和文档版本控制变得很困难,尤其对于有许多 API 或资源的应用程序,或者在 API 采用迭代式开发方式时。这些文档类型在集成到自动化测试应用程序中时变得更难。

开源 Swagger 框架帮助 API 使用者和开发人员纠正了这些问题。该框架为创建 JSON 或 YAML(JSON 的一个人性化的超集)格式的 RESTful API 文档提供了 OpenAPI 规范(以前称为 Swagger 规范)。Swagger 文档可由各种编程语言处理,可在软件开发周期中签入源代码控制系统中,以便进行版本管理。

发布服务

服务主要包括模型代码两部分,模型即指一些模型对象,如 glm 函数的结果;代码是指调用模型的过程,主要对传输参数进行一些处理。

1
2
3
4
5
6
7
8
9
10
11
12
13
14
15
16
17
18
19
20
21
22
23
24
25
26
27
28
29
30
31
32
33
34
35
36
37
38
39
40
41
42
43
44
45
46
47
48
49
50
51
52
53
54
55
56
57
58
59
60
61
62
63
64
65
66
67
# For R Server 9.0, load mrsdeploy package on R Server     
library(mrsdeploy)

# --- AAD login ----------------------------------------------------------------

# Use `remoteLogin` to authenticate with R Server using
# the local admin account. Use session = false so no
# remote R session started
# REMEMBER: Replace with your login details
remoteLogin("http://localhost:12800",
username = “admin”,
password = “{{YOUR_PASSWORD}}”,
session = FALSE)

# Information can come from a file
model <- "model <- glm(formula = am ~ hp + wt, data = mtcars, family = binomial)"
code <- "newdata <- data.frame(hp = hp, wt = wt)\n
answer <- predict(model, newdata, type = 'response')"

cat(model, file = "transmission.R", append = FALSE)
cat(code, file = "transmission-code.R", append = FALSE)

# Generate a unique serviceName for demos
# and assign to variable serviceName
serviceName <- paste0("mtService", round(as.numeric(Sys.time()), 0))

api <- publishService(
serviceName,
code = "transmission-code.R",
model = "transmission.R",
inputs = list(hp = "numeric", wt = "numeric"),
outputs = list(answer = "numeric"),
v = "v1.0.3",
alias = "manualTransmission"
)

api

result <- api$manualTransmission(120, 2.8)
result
print(result$output("answer")) # 0.6418125

swagger <- api$swagger()
cat(swagger)

swagger <- api$swagger(json = FALSE)
swagger

services <- listServices(serviceName)
services

serviceName <- services[[1]]
serviceName

api <- getService(serviceName$name, serviceName$version)
api
result <- api$manualTransmission(120, 2.8)
print(result$output("answer")) # 0.6418125

cap <- api$capabilities()
cap
cap$swagger

status <- deleteService(cap$name, cap$version)
status

remoteLogout()

服务支持的参数的类型和返回值类型均为以下几种:

  • numeric
  • integer
  • logical
  • character
  • vector
  • matrix
  • data.frame

如果 code 是函数,只有一个值可以返回。

代码和模型

区别

官方文档没有明确指出 Code 和 Model 的区别。但是从代码和性能分析的角度,可以发现 Code 和 Model 有以下区别:

  1. Model 部分的代码是发布服务的时候执行的, Code 部分则是在接收网络请求的时候执行的。因为 Model 部分只包含一个模型,不可能在每次网络请求中都执行,否则求解模型的时间会很长。在网络请求中, Model 部分会被加载到 Code 部分。
  2. Model 部分不接收网络请求的参数(即发布服务时指定的 inputs ),也不提供返回参数(即发布服务时指定的 outputs )。接收参数和返回参数的提供是在 Code 部分中进行的。
  3. Model 部分一般是 R 对象, Code 部分一般是可执行体。

由于有这样的区别,因此使用动态模型只能在 Code 中进行,而且最好将接口设计为异步接口。

类型

来源
Code指向 R 脚本的文件路径
字符串形式的 R 代码片段
R 函数
Model指向 .RData 文件的路径
指向 R 脚本的文件路径,用于加载环境
模型对象,如 model = am.glm

与 Web 服务集成

发布的 R 服务可以与 Web 服务集成。利用服务提供的 swagger.json 文件,可以使用 Swagger 自动生成 API 接口代码以及文档。主要流程为:

  1. 获取 Swagger 工具和文件
  2. 使用 Swagger 生成 API 库
  3. 添加认证逻辑
  4. 通过库与 API 交互或使用服务

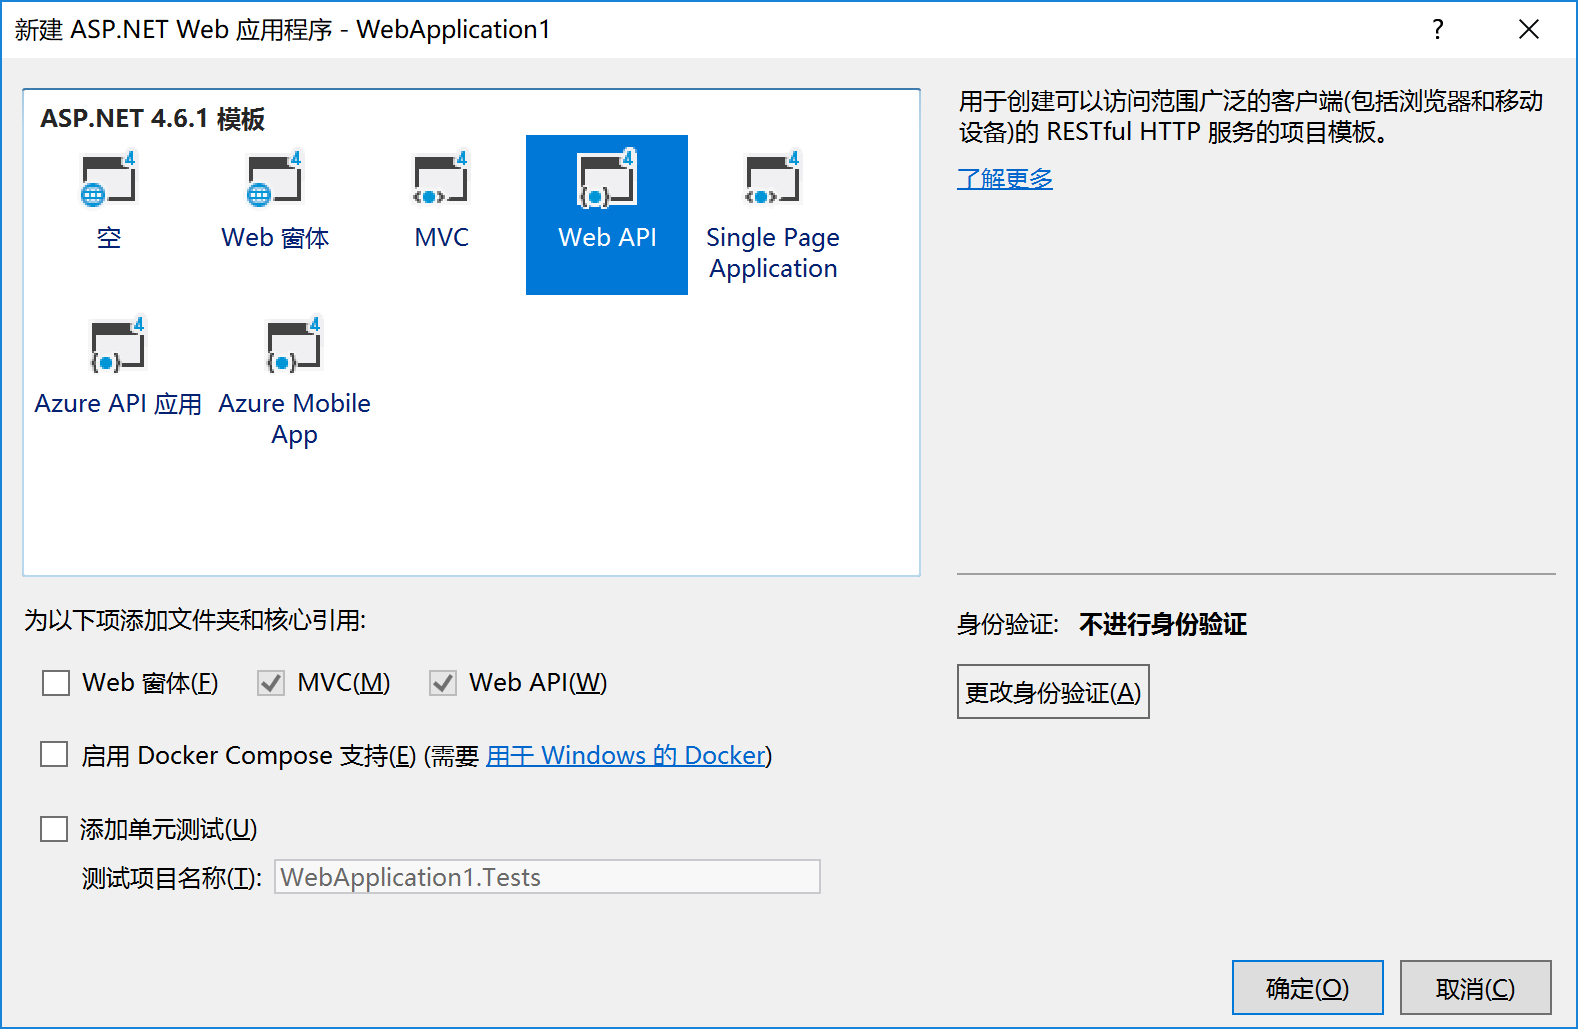
以 mtService 与 ASP.NET 为例,首先创建 ASP.NET Web API 工程。
ASP.NET MVC 框架

MVC 是三个 ASP.NET 开发模型之一。

MVC 是用于构建 web 应用程序的一种框架,使用 MVC (Model View Controller) 设计:

  • Model(模型)表示应用程序核心(比如数据库记录列表)。是应用程序中用于处理应用程序数据逻辑的部分。通常模型对象在数据库中存取数据。
  • View(视图)对数据(数据库记录)进行显示。是应用程序中处理数据显示的部分。通常从模型数据中创建视图。
  • Controller(控制器)处理输入(写入数据库记录)。是应用程序中处理用户交互的部分。通常控制器从视图读取数据、控制用户输入,并向模型发送数据数据。

MVC 的这种拆分有助于我们管理复杂的应用程序,因为您能够在同一时间关注一个方面。例如,您可以在不依赖业务逻辑的情况下对视图进行设计。同时对应用程序的设计也更加容易。MVC 的这种拆分同时也简化了分组开发。不同的开发人员可同时开发视图、控制器逻辑和业务逻辑。

然后使用 AutoRest 或 Swagger Codegen 生成 C# 代码:

1
AutoRest.exe -CodeGenerator CSharp -Modeler Swagger -Input swagger.json -Namespace Transmission

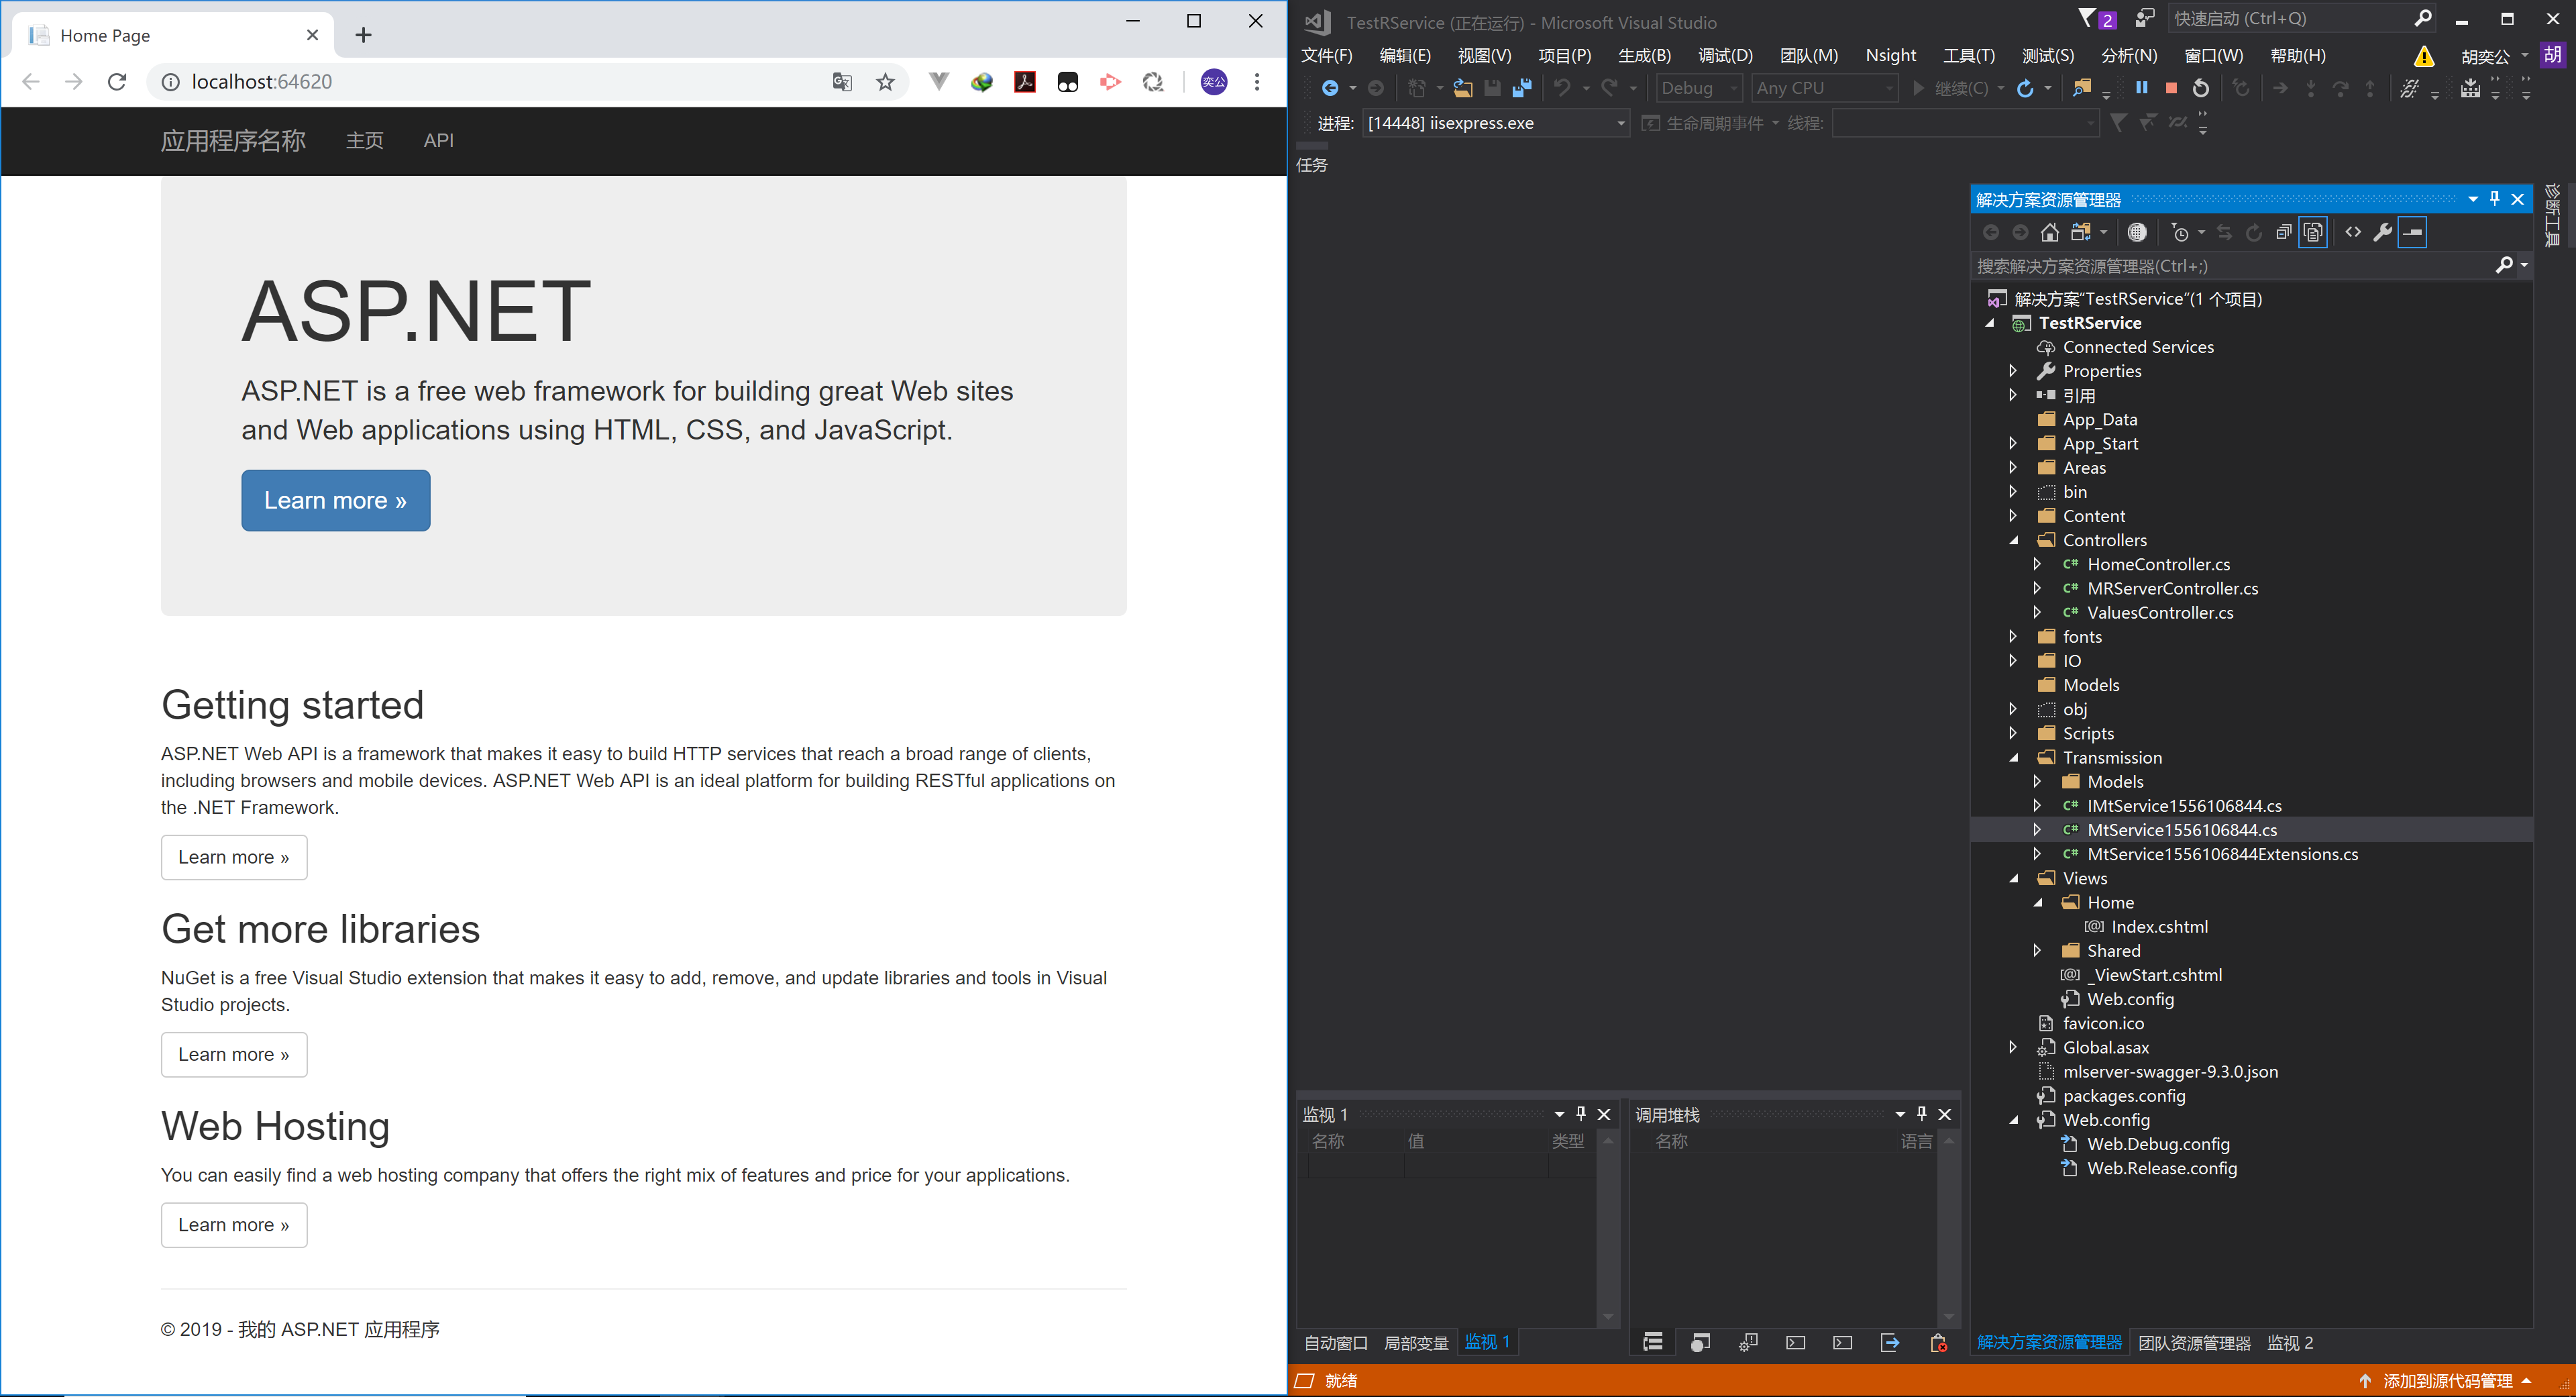
会在 swagger.json 所在文件夹下创建一个 Generate 文件夹,里面保存了生成的代码,文件结构如下:

  • Models
    • AccessTokenResponse.cs
    • BatchWebServiceResult.cs
    • Error.cs
    • ErrorException.cs
    • InputParameters.cs
    • LoginRequest.cs
    • OutputParameters.cs
    • RenewTokenRequest.cs
    • RenewTokenRequest.cs
    • StartBatchExecutionResponse.cs
    • WebServiceResult.cs
  • IMtService1556106844.cs
  • MtService1556106844.cs
  • MtService1556106844Extensions.cs

每个文件都包含一个类,这些类都声明在 Transmission 命名空间中,结合 C# 命名空间取值的特点,建议将这些文件放在 ASP.NET 工程根目录的 Transmission 目录下。

另外一种方式,是将命名空间声明为 RService.Transmission ,可以将 R 服务都放置在工程根目录的 RService 目录下(如将这个服务放置在工程根目录的 RService/Transmission 目录下),便于多个接口的管理。

然后 Controllers 文件夹下,创建一个 Web API 控制器类,命名为 MtServiceController 。即可生成一个 Controller 的基本代码。
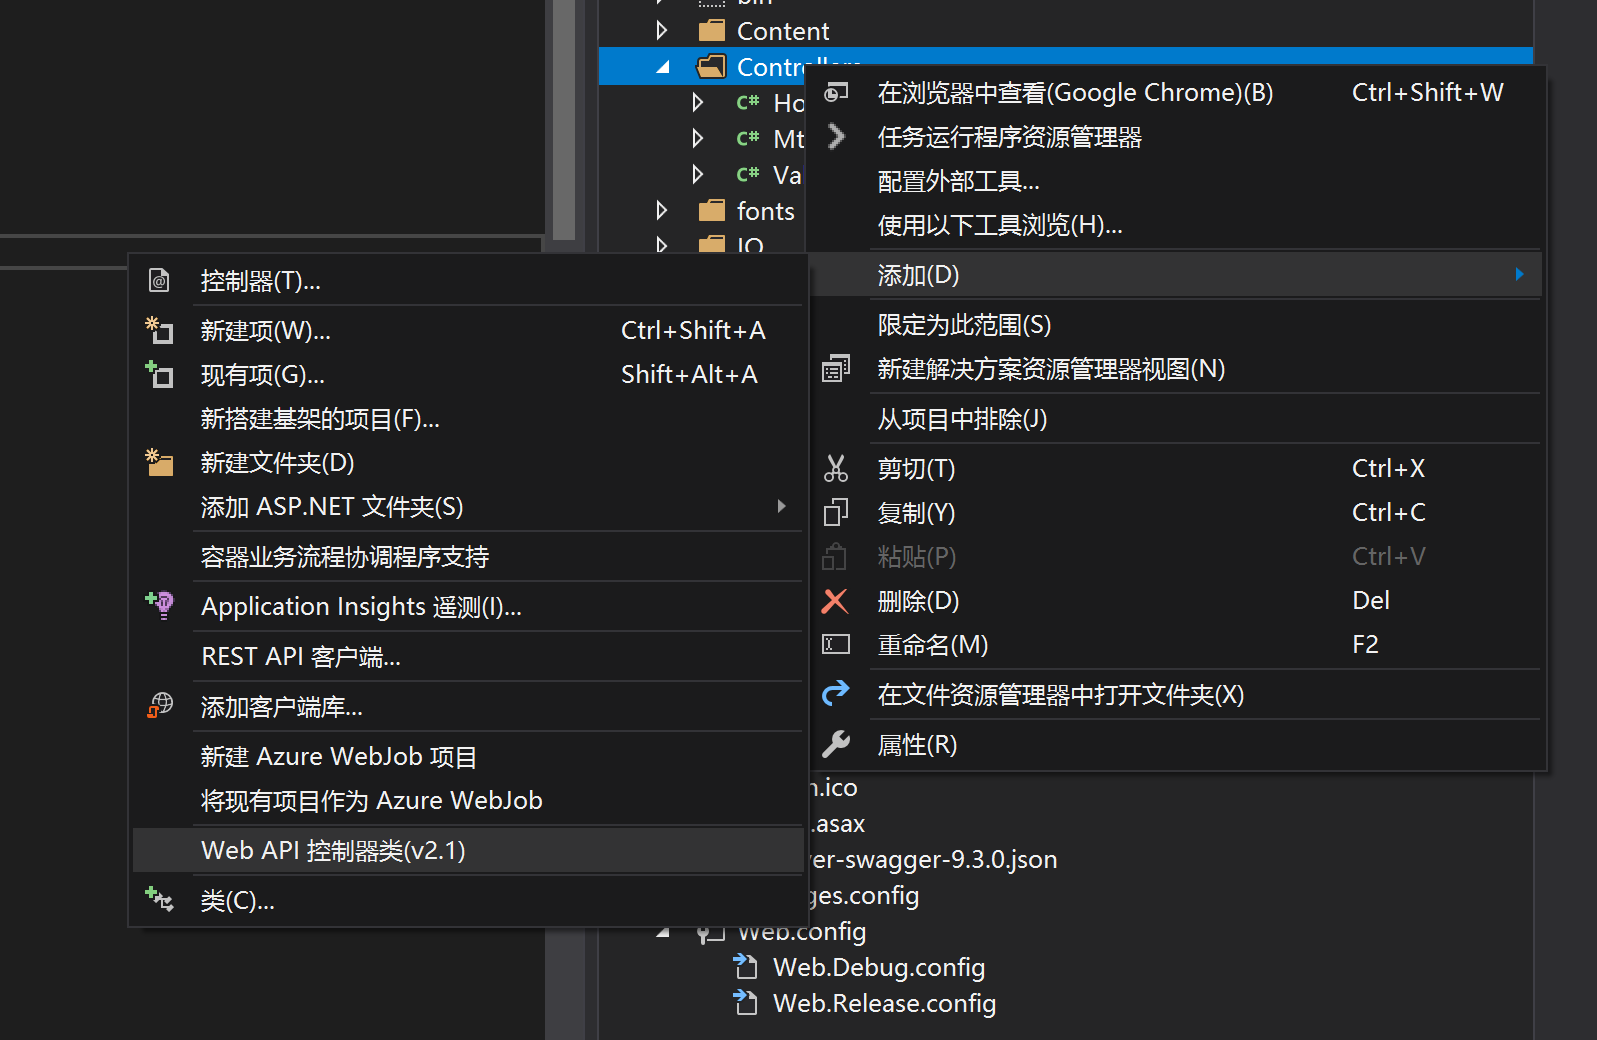
基本代码如下:

1
2
3
4
5
6
7
8
9
10
11
12
13
14
15
16
17
18
19
20
21
22
23
24
25
26
27
28
29
30
31
32
33
34
35
36
37
38
39
using System;
using System.Collections.Generic;
using System.Linq;
using System.Net;
using System.Net.Http;
using System.Web.Http;

namespace TestRService.Controllers
{
public class TempController : ApiController
{
// GET api/<controller>
public IEnumerable<string> Get()
{
return new string[] { "value1", "value2" };
}

// GET api/<controller>/5
public string Get(int id)
{
return "value";
}

// POST api/<controller>
public void Post([FromBody]string value)
{
}

// PUT api/<controller>/5
public void Put(int id, [FromBody]string value)
{
}

// DELETE api/<controller>/5
public void Delete(int id)
{
}
}
}

该基本代码提供了 GET 、 POST 、 PUT 、 DELETE 四种 HTTP 请求类型的支持。现在只需要对这些进行修改。即可。

对带参数的 GET 方法进行修改的方法

  1. 将参数修改为两个: hpwt 。直接修改 public string Get(int id) 的声明:

    1
    2
    - public string Get(int id)
    + public double? Get(double hp, double wt)

    即对 GET 方法添加了两个参数,都是 double 类型。

  2. 创建 R 服务对象,指明服务基地址。

    1
    2
    3
    4
    public double? Get(double hp, double wt)
    {
    MtService1556106844 client = new MtService1556106844(new Uri("http://192.168.41.49:12800"));
    }

    在有 SSL 证书时可以使用 HTTPS 协议。

  3. 添加服务的认证:在 Get 方法中使用 Transmission 库自带的 LoginRequest 类进行认证。

    1
    2
    3
    4
    5
    6
    7
    8
    9
    10
    11
    12
    13
    14
    15
    16
    17
    18
    public double? Get(double hp, double wt)
    {
    MtService1556106844 client = new MtService1556106844(new Uri("http://192.168.41.49:12800"));
    // --- AUTHENTICATE WITH ACTIVE DIRECTORY -----------------------------------------
    // Note - Update these with your appropriate values
    // Once authenticated, user won't provide credentials again until token is invalid.
    // You can now begin to interact with the operationalization APIs
    // --------------------------------------------------------------------------------
    var loginRequest = new LoginRequest("admin", "GWmodel-Lab2018");
    var loginResponse = client.Login(loginRequest);
    //
    // SET AUTHORIZATION HEADER WITH BEARER ACCESS TOKEN FOR FUTURE CALLS
    //
    var headers = client.HttpClient.DefaultRequestHeaders;
    var accessToken = loginResponse.AccessToken;
    headers.Remove("Authorization");
    headers.Add("Authorization", $"Bearer {accessToken}");
    }

    这里的用户名 admin 和密码 GWmodel-Lab2018 是 Machine Learning Server 在启动的时候,设置的用户名和密码。

  4. 调用 R 服务并返回结果:在 Get 方法中使用 Transmission 库调用 R 服务。

    1
    2
    3
    4
    5
    6
    7
    8
    9
    10
    11
    12
    13
    14
    15
    16
    17
    18
    19
    20
    21
    22
    public double? Get(double hp, double wt)
    {
    MtService1556106844 client = new MtService1556106844(new Uri("http://192.168.41.49:12800"));
    // --- AUTHENTICATE WITH ACTIVE DIRECTORY -----------------------------------------
    // Note - Update these with your appropriate values
    // Once authenticated, user won't provide credentials again until token is invalid.
    // You can now begin to interact with the operationalization APIs
    // --------------------------------------------------------------------------------
    var loginRequest = new LoginRequest("admin", "GWmodel-Lab2018");
    var loginResponse = client.Login(loginRequest);
    //
    // SET AUTHORIZATION HEADER WITH BEARER ACCESS TOKEN FOR FUTURE CALLS
    //
    var headers = client.HttpClient.DefaultRequestHeaders;
    var accessToken = loginResponse.AccessToken;
    headers.Remove("Authorization");
    headers.Add("Authorization", $"Bearer {accessToken}");

    InputParameters inputs = new InputParameters() { Hp = hp, Wt = wt };
    var serviceResult = client.ManualTransmission(inputs);
    return serviceResult.OutputParameters.Answer;
    }

POST 方法、 PUT 方法的编写本质上和 GET 方法的编写没有什么区别。不同的地方在于, POST 方法中的参数通过请求体进行,而不是请求地址。参数类型可以直接声明为 InputParameters 类型,因为这个类型支持 JSON 反序列化。

1
2
3
4
5
6
7
8
9
10
11
12
13
14
15
16
17
18
19
20
21
22
23
24
25
26
27
28
namespace Transmission.Models
{
using Newtonsoft.Json;
using System.Linq;

public partial class InputParameters
{
public InputParameters()
{
CustomInit();
}

public InputParameters(double? hp = default(double?), double? wt = default(double?))
{
Hp = hp;
Wt = wt;
CustomInit();
}

partial void CustomInit();

[JsonProperty(PropertyName = "hp")]
public double? Hp { get; set; }

[JsonProperty(PropertyName = "wt")]
public double? Wt { get; set; }
}
}

当请求体是如下的 HTTP 请求时,程序可以自动获取到这些参数:

1
2
3
4
5
6
7
POST http://localhost:64620/api/MtService HTTP/1.1
Content-Type: application/json

{
"hp": 120,
"wt": 2.8
}

另外,在 GET 等方法的返回值中,如果 R 服务的返回值类型是 vector 、 matrix 或 data.frame ,那么不能直接以 XML 返回,需要调用 ToString() 函数返回。但是可以直接以 JSON 返回。方法是:

1
2
3
4
5
6
7
8
9
10
11
12
13
14
15
16
17
18
19
20
21
22
23
public double? Get(double hp, double wt)
{
MtService1556106844 client = new MtService1556106844(new Uri("http://192.168.41.49:12800"));
// --- AUTHENTICATE WITH ACTIVE DIRECTORY -----------------------------------------
// Note - Update these with your appropriate values
// Once authenticated, user won't provide credentials again until token is invalid.
// You can now begin to interact with the operationalization APIs
// --------------------------------------------------------------------------------
var loginRequest = new LoginRequest("admin", "GWmodel-Lab2018");
var loginResponse = client.Login(loginRequest);
//
// SET AUTHORIZATION HEADER WITH BEARER ACCESS TOKEN FOR FUTURE CALLS
//
var headers = client.HttpClient.DefaultRequestHeaders;
var accessToken = loginResponse.AccessToken;
headers.Remove("Authorization");
headers.Add("Authorization", $"Bearer {accessToken}");

InputParameters inputs = new InputParameters() { Hp = hp, Wt = wt };
var serviceResult = client.ManualTransmission(inputs);
- return serviceResult.OutputParameters.Answer;
+ return Json(serviceResult.OutputParameters.Answer);
}

连接池

当您提前创建会话和加载依赖项时,可以快速连接到Web服务。 会话在专用于特定Web服务的池中可用,其中每个会话包括R解释器的实例和Web服务所需的依赖关系的副本。 例如,如果您为使用Matplotlib,dplyr,cluster,RevoScaleR,MicrosoftML和mrsdeploy的Web服务提前创建了10个会话,则每个会话都将拥有自己的R解释器实例以及内存中加载的每个库的副本。

具有专用会话池的Web服务从不请求来自通用会话池共享资源的连接,即使在达到最大会话时也是如此。 通用会话池仅为那些没有专用资源的Web服务提供服务。

mrsdeploy 提供以下三个函数来创建和管理会话:

  • configureServicePool
  • getPoolStatus
  • deleteServicePool

创建连接池:

1
2
3
4
5
6
7
8
9
10
11
12
13
14
15
# load mrsdeploy and print the function list
library(mrsdeploy)
ls("package:mrsdeploy")

# Return a list of web services to get the service and version
# Both service name and version number are required
listServices()

# Create the session pool using a case-sensitive web service name
# A status code of 200 is returned upon success
configureServicePool(name = "myWebservice1234", version = "v1.0.0", initialPoolSize = 5, maxPoolSize = 10 )

# Return status
# Pending indicates session creation is in progress. Success indicates sessions are ready.
getPoolStatus(name = "myWebService1234", version = "v1.0.0")

删除连接池:

1
2
3
4
5
# Return a list of web services to get the service and version information
listServices()

# Deletes the dedicated session pool and releases resources
deleteServicePool(name = "myWebService1234", version = "v1.0.0")

获取连接池信息:

1
2
3
4
5
6
7
8
# Deletes the dedicated session pool and releases resources
deleteServicePool(name = "myWebService1234", version = "v1.0.0")

# Check the real-time status of dedicated pool
getPoolStatus(name = "myWebService1234", version = "v1.0.0")

# make sure the return status is NotFound on all computeNodes
# if not, issue anthor deleteServicePool command again
感谢您的阅读,本文由 HPDell 的个人博客 版权所有。如若转载,请注明出处:HPDell 的个人博客(http://hpdell.github.io/编程/microsoft-machine-learning-server/
通过 Metaweblog API 给 Hexo 接入客户端
HTML5 播放 RTSP 视频